In Viking Rise, workers play a significant role in the game’s economy. They will help you gather more resources, construct buildings, and collect lost resource supplies. This guide will cover everything you need to know about workers in Viking Rise, including how they work, their grades and abilities, and what are the best ways to obtain them.
Worker Grades in Viking Rise
In Viking Rise, workers are classified by grades, which determine the quality of each worker. There are 5 grades available, each having its own bonuses and stats. The better the grade is, the higher the stats are. The lowest-quality workers are the grade D, whereas the highest-quality workers, and the most difficult to obtain, as well as the most expensive ones to recruit, are the grade S.
- Grade D – Tired Workers (gray color). These are the weakest workers.
- Grade C – Ordinary Workers (green color)
- Grade B – Diligent Workers (blue color)
- Grade A – Skilled Workers (purple color)
- Grade S – Seasoned Workers (orange color). These are the best workers.
Worker Specialities
Besides quality grades, workers also have specialties. All workers have the same specialties, 7 specialties in total, but only one main specialty, which will determine the worker’s role, and the building to which should be assigned.
However, the S-grade workers have 2 main specialties, which makes 8 specialties in total. These specialties can be checked inside the Worker Overview tab (more details below) by tapping any avatar from the worker’s list.
These specialties include Construction time and speed, Research time, Eagle Flight speed, Training queue, Manage village, Errand speed, and Forging SPD.
How to get workers in Viking Rise
As we mentioned in our Viking Rise beginner’s guide, having a large number of workers is beneficial for your city since it enables you to construct more buildings and collect resources faster. There are various ways to get workers in Viking Rise, and below are some of the best methods to obtain them.
Through the Recruitment section
The main method of obtaining Viking Rise workers is through Recruitment, which becomes available after building the Clan Camp (more details about this building below). In this section, you will find different types of workers that you can recruit by paying the corresponding fee in Bronze Coins. Each day you get a new batch of 3 workers, but you can also refresh them for 200 Bronze Coins.
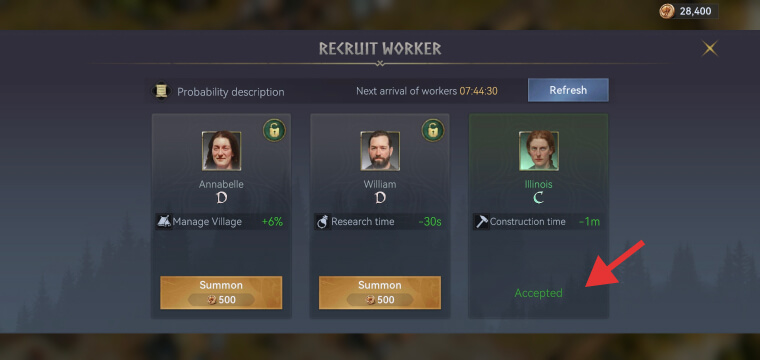
The price for recruiting workers is affected by the quality grade. The better the quality is, the more expensive the worker will be to recruit. For instance, a grade A worker, costs 8,000 Bronze Coins, while a grade C worker, 1,200.
Recruitment Probability
Better quality workers will be difficult to recruit in the beginning, but the more you upgrade your Commission level (more details below), the better the chances to have better quality workers for recruiting on each refresh will be. As an example, the chances of recruiting workers at a Commission level 1, are as follows:
- Grade D (70%)
- Grade C (21.5%)
- Grade B (7.49%)
- Grade A (1%)
- Grade S (0.01%)
Staging Post – Bounty Rescue Missions
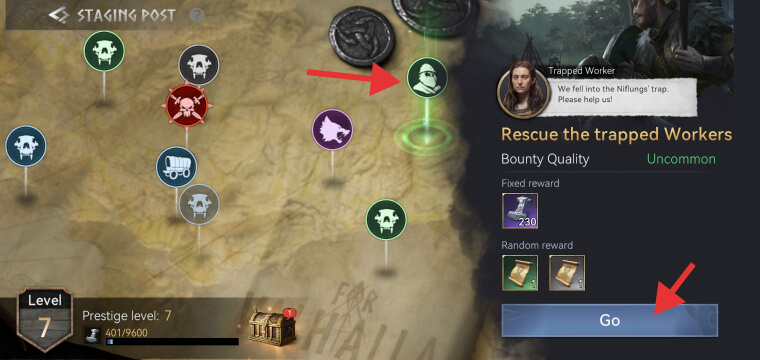
Bounty rescue missions inside the Staging Post campaign are a simple way to obtain more workers. As with any other bounty missions/tasks on this map, Workers Rescue missions will offer a chance to obtain one worker from a random reward.
This reward will include certain quality types of workers based on the quality of the mission, Common, Uncommon, Rare, Epic, or Legendary.
The percentage of receiving better missions/tasks is determined by the current level of your Prestige Level, which is displayed in the bottom-left corner. This level can only be increased by completing bounty missions. The higher the Prestige level is, the higher the chances to get better-quality Bounty missions, and therefore better quality workers.
Capturing new villages
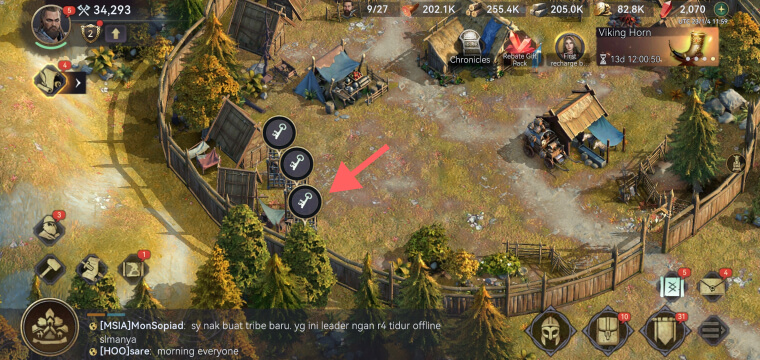
Each village you occupy also includes some captured workers. All you need to rescue them is to tap the cages displaying a key icon(see the screenshot). If you have reached the maximum number of workers, the Replacing worker’s pop-up window will appear, which I will describe in more detail next.
How to replace workers
Unlike in other war strategy mobile games, in Viking Rise, you can recruit up to 40 workers with different specialties and attributes. Once you reach this number, you can replace the weakest workers with better ones.
How to replace workers
To replace a worker, recruit a new one, and the Replace Worker window will pop up. On the left side of the screen, you will have the list of all recruited workers. On the right side, you will have the newly hired worker, all his stats, and the Replace button.
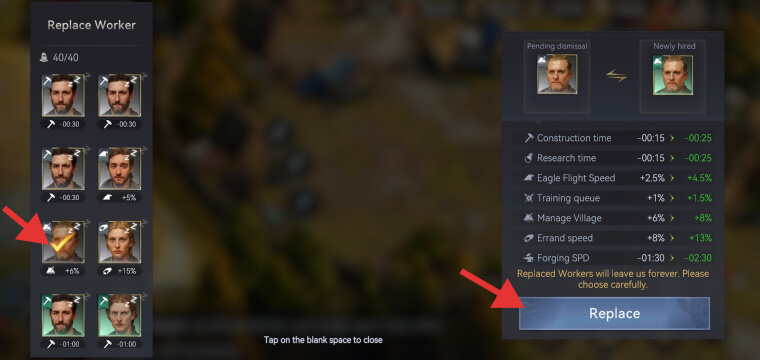
Next, tap a worker from the list, and you’ll notice that the stats from the right side, will now show you a comparison between the two. Tap the Replace button, and a note pop-up window will appear, asking you to confirm the dismissal. Hit the Ok button, and the worker will be replaced. Be aware that the replaced workers will be dismissed forever, so pick carefully the workers you want to replace.
When you should consider replacing a worker?
You should consider replacing a worker whenever you get a better quality worker, or if you need a worker with specific abilities or one that has new abilities that none of your recruited workers have.
The Clan Camp
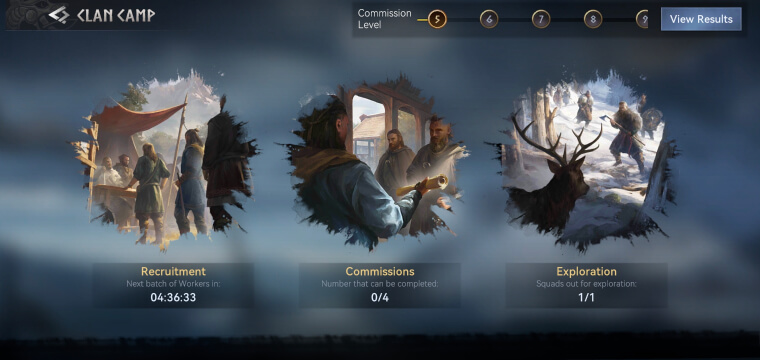
The Clan Camp structure allows you to recruit new workers and improve the probability of recruiting by participating in Commissions and Exploration encounters.
Recruitment
The Recruitment section inside Clan Camp, for which we described the entire process of recruiting above, allows you to recruit new workers.
Commissions
The Commissions area becomes available after upgrading your Chief Hall to level 8. Here you can send your workers on various missions to collect materials. Upon completion, you will receive Bronze Coins and Commission Experience, which will automatically increase the Commission level.
The purpose of completing Commissions and increasing the Commission level is to increase the probability percentage of obtaining better quality workers after each refresh or a new batch of workers every day.
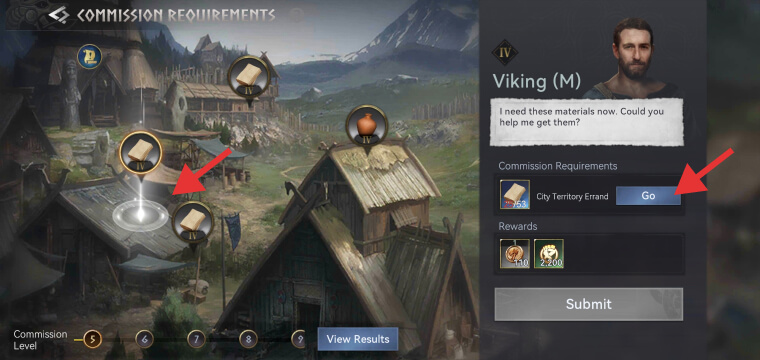
To start a Commission quest, pick any of the available quests and hit the “Go” button, which will redirect you somewhere on the map outside of your city, to a pile of materials. Tap the pile and the countdown will start.
Next, go back to your city, tap the Clan Camp building again, visit the Commissions page, and repeat the same process until you’ve started all the quest bubbles (those you see in the above screenshot).
Once the quests are complete, you will see an icon over the Clan Camp tents/building, which informs you that at least a Commissions quest is complete. Visit the Commissions page, tap the quests again, and hit the “Submit” button and you’ll receive the rewards.
Exploration
Once you reach level 5 with Commissions, you can access Exploration, which will include new types of missions/encounters for your workers. These encounters will reward you with different Commission materials required to increase the Commission level.
Exploration Map
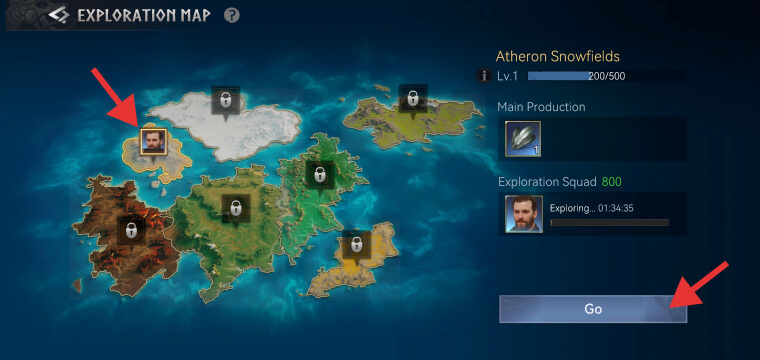
The Exploration map includes 7 different zones that you can explore, each with its own requirements and specific material rewards. The zones are:
- Atheron Snowfields: this is the zone you will begin with and has Feathers as the main production material.
- Nova’s Forest: requires Commission level 7 and offers Berries as the main production material.
- Dana Plains: requires Commission level 9 and offers Leaf materials.
- Mt. Khajag: requires Commission level 11 and offers Cooper.
- Aslta Range: requires Commission level 14 and offers Ash Branch.
- Dornjford: requires Commission level 17 and has Gravel materials.
- Gertland Island: requires Commission level 20 and offers the Silkworm Cocoon material.
How to start an Exploration encounter
To start an Exploration encounter, tap the Exploration and form a squad of workers that have the right specialty. Those that are best suited for the current missions, will have an “ok” icon displayed on their avatars. Choosing the right specialty is important as it will provide you with a bonus reward after completing an Exploration mission.
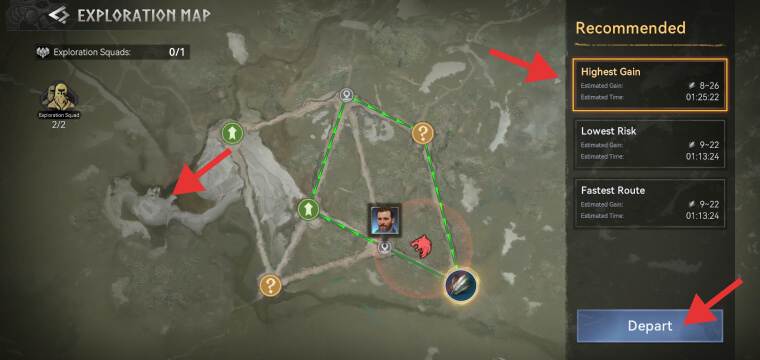
After forming the squad, you need to pick one of the 3 routes that will appear on the right side of the screen: Highest Gain, Lowe Risk, and Fastest Route. The Highest Gain route offers the best rewards, but has also the highest risk, whereas the Fastest Route, as the name suggests, will provide you with the quickest completion for an Exploration mission, but with fewer rewards.
The one thing you should be aware of when assigning workers on Exploration missions is the dangers intersecting with your chosen route, as this will affect your success rate.
To increase your chances of success, you should not only pick the workers with the right specialty but also those having the highest grade (S grade – orange color, or A grade – purple color). Generally, it depends on the quality of the quest, so I would recommend matching the color of the mission to the grade/color of the chosen squad of workers.
Worker Info
The Worker Info page will offer you an overview of the total number of workers, their abilities, and quality grades. To access the Worker Info, tap the worker icon visible on the left side of the screen, right above the build (hammer) icon.
Construction Queue
Construction Queue is the first tab on the Worker Info page. Here you will have a list of different buildings to which you can assign workers based on their specialties.
Once assigned, they will provide you with great bonuses, such as decreased construction speed or time, decreased research time, increased eagle flight speed, increased training queue, and so on. These bonuses are affected by the quality of each worker. The better the quality, the better the bonus.
Builder’s Hut
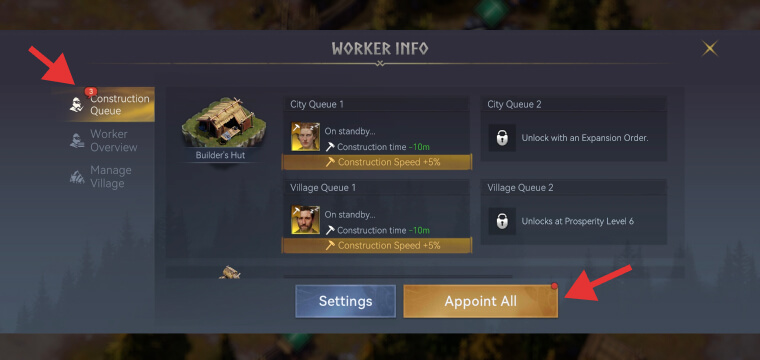
The first building you’ll see on this list is the Builder’s Hut. This building is responsible for workers that are specialized in building construction and building upgrades. Here you will see 4 boxes: City Queue 1, City Queue 2, Village Queue 1, and Village Queue 2.
City Queue 1 is the main slot to which you can assign a builder worker, responsible for all the constructions and building upgrades in your city. To assign a worker, tap the empty slot, or use the Appoint All button and it will automatically assign the best-specialized worker for this task.
City Queue 2 allows you to unlock a second construction queue for 2 days in your city, using an Expansion Order. These items can be obtained from various sources including events, such as the Harvest Festival, and Staging Post’s Bounty Missions.
Upon use, you assign another worker from the list and it will allow you to have 2 building upgrades active at the same time in your city. I would recommend picking a worker with the highest construction buffs (the same goes for City Queue 1).
Village Queue 1 is similar to City Queue 1 but applies only to constructions and building upgrades inside your occupied villages.
Village Queue 2 allows you to assign a second builder worker to your villages, but you’ll first need to reach Prosperity Level 6 to unlock it. Prosperity Level is similar to what the VIP level is in other strategy mobile games.
Other specialty buildings
Below the Builder’s Hut building inside the Construction Queue tab, you will also see other buildings to which you can assign workers. These buildings might be different on your side, depending on your progress and which buildings you’ve already built. Other buildings include:
- Academy, where you can assign workers specialized in researching new technologies. These will have a chemical vessel icon and will decrease the research time considerably, based on their quality grade.
- Eagle’s Nest: The workers specialized for this building have an eagle icon on the top-left corner which will increase the eagle’s speed while scouting. You will have 2 slots available, and the third slot can be unlocked by upgrading the Eagle Nest building to level 12.
- Infantry, Pikemen, Archer, and Porter Barracks: The workers having the Training Queue specialty can be assigned to any of these 4 important buildings, which will increase the training queue based on their grade
- Resource Hut: The workers assigned to this building must have the Manage Village specialty, displayed by the little tent icon which will increase the resource gathering.
- Supply Hub: The workers with the Manage Village specialty can be assigned to this building as well, and they will conduct trades and provide you with certain items periodically. This small reward must be collected by tapping the small bag of coins icon that appears over the Supply Hub building in your occupied villages.
Appoint All and Settings
Once pressed, the Appoint All button will automatically assign all workers to the right building, based on their specialties and the selected priority. You can also decide the Queue priority settings by clicking the Settings button next to the Appoint All button. On this page, you can either hold and drag each box and rearrange them as you wish, or switch between the options at the bottom, Prioritize Specialty and Prioritize Attribute.
Worker Overview
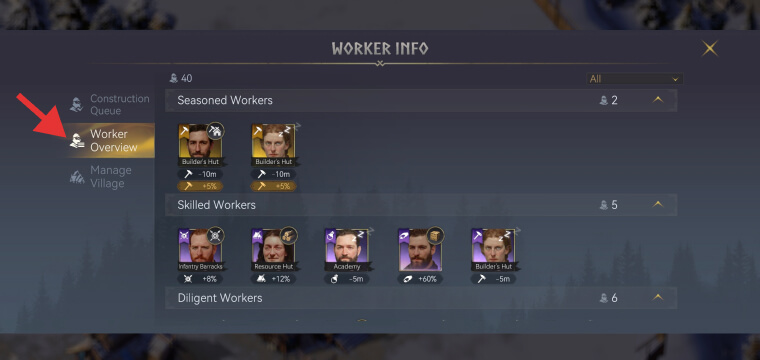
As the name suggests, here you will have all your recruited workers listed, based on their grades. On the top-left side, you have the total number of recruited workers, and on the right side, you can sort your workers based on their main specialty.
The main worker specialties are Construction Speed, Construction Time, Research Time, Eagle Flight Speed, Training Queue, Manage Village, Errand speed, and Forging SPD.
Additionally, on the top-right corner of each avatar, you’ll a small icon, which informs you whether the worker is currently assigned to a building or task, or not. If it’s not, you will see a “zzz” animation, which means it’s idle.
Manage Village
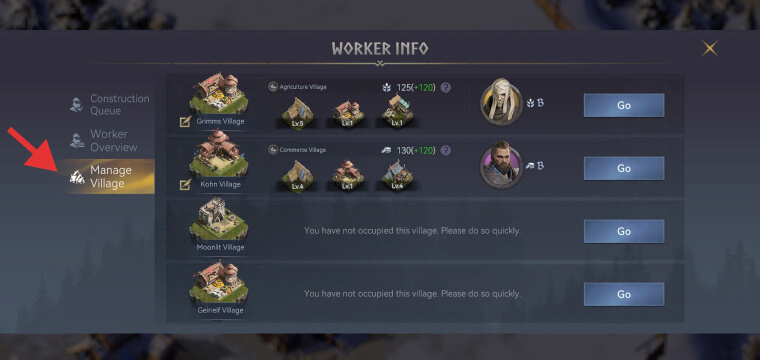
As the name implies, on the Manage Village tab, you can have an overview of your occupied villages, the buildings included in each village, the Manager Bonus, and the assigned Viking Rise hero to each village.
To assign a hero to a village, tab the circled slot next to the “Go” button and select one from the recommended list. Each hero has 3 specialties, among which only one has the highest grade, measured from D to S, the same as with workers.
Therefore, you should pick those that have the highest grade for the specialty corresponding to the Manager slot, whether is Agriculture, Commerce, or Security. The Manager bonus is determined by the assigned hero and his Specialty.
Viking Rise Workers FAQ
Which workers are best in Viking Rise?
The best workers in Viking Rise, are the S-grade workers, also known as Seasoned Workers. They provide you with the best specialty bonuses.
What's the difference between City Queue and Village Queue?
City Queue refers to the maximum allowed number of workers you can assign at the same time for building constructions and upgrades in your city. Village Queue is the same but it applies to the buildings in your occupied villages.
How many workers can I have?
You can have a maximum of 40 active workers in Viking Rise, but you can replace them with better ones, whenever you want.