
Nations of Darkness offers an engaging and immersive strategy game experience and a lot of interesting content. You can choose your favorite faction, build up your city, upgrade powerful heroes, and engage in fascinating PvE or PvP battles. But where do you start?
For someone who is just starting out, with so much great content and competition among players, it can be difficult to understand how the game works, or even what to do first. In this guide, we’ll look at the basics of the Nations of Darkness game, and give you some tips and tricks to get you started on the right foot and speed up your progress.
Getting started with Nations of Darkness
Nations of Darkness is a newly released kingdom-builder, strategy mobile game, that features a fascinating storyline and four captivating factions: Vampire, Werewolf, Hunter, and Mage. The story begins with a mysterious darkness threatening to consume the world after a long period of chaos, where these factions compete against each other in epic battles for control. As the leader of your chosen faction, you will take control of your survivors and build your kingdom from the ruins of chaos.
Choosing a Faction


As you’ll be starting out, 4 factions will be presented for you to choose from. Each faction has its own unique advantages and playstyle. For beginners, I would recommend either the Vampire or the Hunter faction, because both are good for faster city development.
- Vampire (my favorite) – These blood-thirsty creatures excel at City development but they require more resources than other factions. This faction’s bonuses are +5% Building Speed and +5% Shooter Attack.
- Werewolf – These mythical creatures can take the form of a human or wolf and have an affinity for Nature. They are not great for fast development but are powerful in combat. This faction’s bonuses are +5% Troop Training Speed and +5% Driver Attack.
- Hunter – These are humans who are gifted with special abilities to hunt and fight supernatural creatures, and a slightly better defense. They have balanced bonuses for both, City development, and combat scenarios. This faction’s bonuses are +5% Resource Output and +5% Fighter Defense.
- Mage – These wise individuals have the power to control and manipulate magic. They are great for City development but not so great in combat. This faction’s bonuses are +5% Research Speed and +5% Fighter Health. At the moment, this faction is still under development, so can not be chosen.
The Combat Modes
In the early stage of the game, before being able to engage in Player vs Player fights, you will have 2 types of combats, the Explore type, and the Bat Elder Camps.
The Explore scenarios
Explore scenarios are automatic turn-based fights, and they will be included in the Abyssal Fortress later. In this type of PvE combat, you will be presented with a set of enemies and your strategy mostly depends on the chosen heroes and how you position them before engaging in the fight.
You’ll probably be tempted to tap the hero cards as soon as they get highlighted, as I was, but that does not change anything because as I said, the fight is entirely automatic. It’s a bummer that they did not at least give us the possibility to decide when to use the special abilities of our heroes.
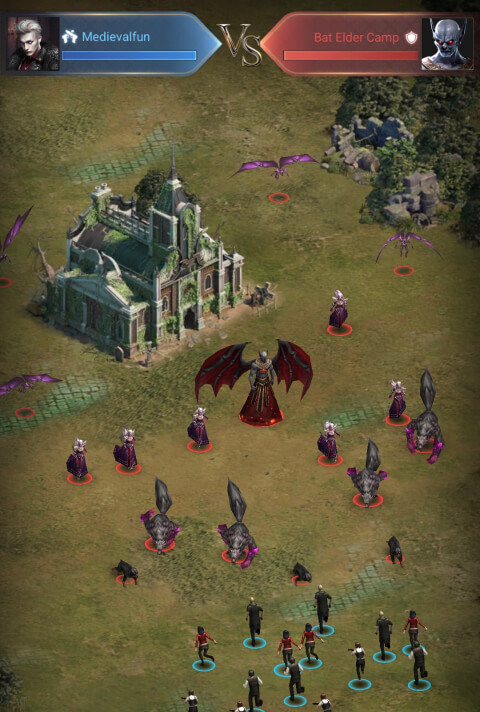
The Bat Elder Camps
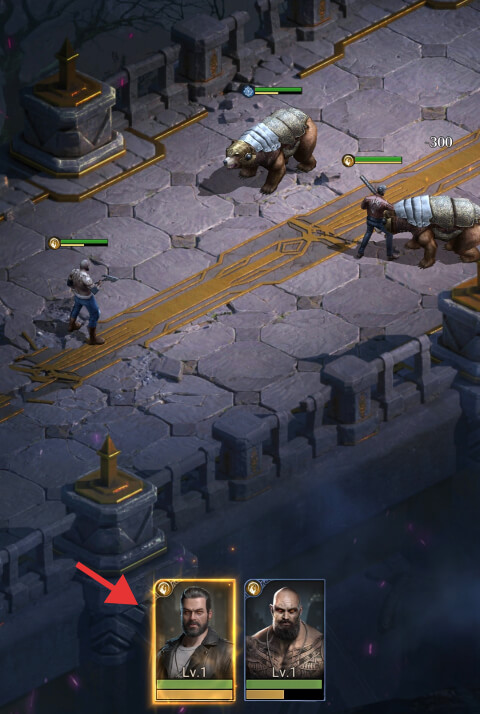
The Bat Elder Camps are also automatic and last even much less than the explore scenarios. The difference between the two is that in Bat Elder Camps your power depends on the number and type of chosen units, in addition to the leading heroes.
You start by having only one hero slot, but more can be unlocked as you upgrade your Town Center. The second hero slot can be unlocked after reaching Town Center level 5, the third at level 7, the fourth at level 9, and the fifth at level 11.
The rewards for completing Bat Elder Camps include resources in general, but I found that the rewards from the Explore scenarios are much better because they offer essential items for upgrading heroes, as well as hero fragments.
Increasing the Power
As in most games of this kind, you’ll want to increase the overall power of your city and army. To do this you should upgrade your buildings, research technologies, and recruit stronger heroes. You can also increase the power of your army by training troops and improving their weapons, armor, and tier.
The more you increase your power, the better chances you’ll have to be accepted in one of the top-ranking alliances, and of course, to defeat your rivals and higher-level monsters, which means better rewards.
Nations of Darkness Tips and Tricks
Here are a few essential tips and tricks for newcomers:
1. Customize your profile
Nations of Darkness is a multiplayer game, which means you can interact with other players. To stand out and make sure you’re noticed, you should customize your profile with a unique name and avatar. By default, every new player is given a generic username made of random letters and numbers, which will make it difficult for other players to remember you.
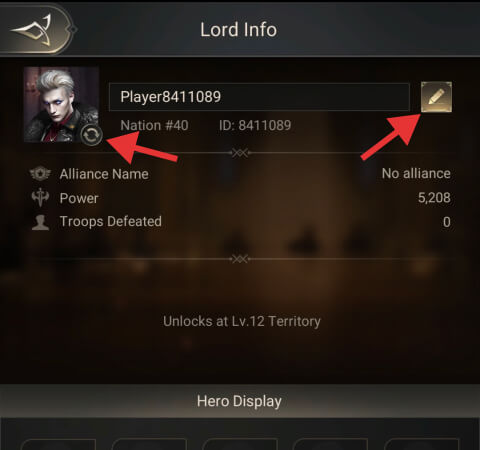
The first rename is free and on top of that, you will be rewarded with 200 Diamonds. As for the avatar, the game offers over 74 avatars. However, in the beginning, you only have 2 avatars unlocked, but you will be able to unlock more as you progress and recruit more heroes.
To change your username, tap your avatar on the top-left corner, and after that, the little pencil icon you see at the top. Type in your desired username, and hit “Free rename”.
2. Take advantage of the beginner’s Peace Shield
This is one of the things I like much about Nations of Darkness is the duration of the Peace Shield that new players have. Unlike most mobile strategy games, Nations of Darkness offers you 7-day protection from PvP attacks. Use this time to learn the game and build your town without having to worry about being attacked. You can also buy additional Peace Shield items from your Alliance Shop with Personal Contribution Points.
Keep in mind that the beginner’s Peace Shield will be deactivated if you start the upgrade of your Town Center for level 12.
3. Use your Faction Recruitment Cards properly
This is one of the biggest mistakes I did in this game in the beginning. I had about 30 Faction Recruitment Cards, but I used them all for the wrong faction. What I mean by that, is that these cards give you the possibility to use them on a specific faction and recruit legendary and epic heroes for that faction only.
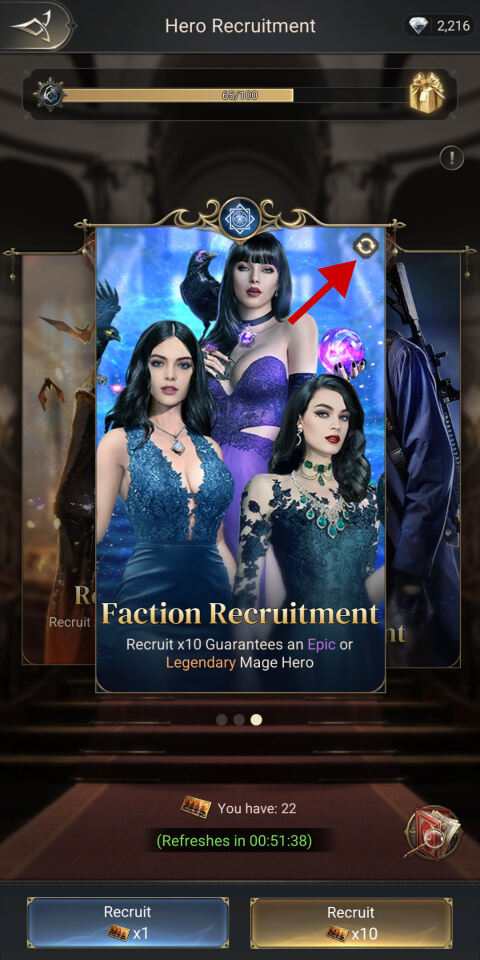
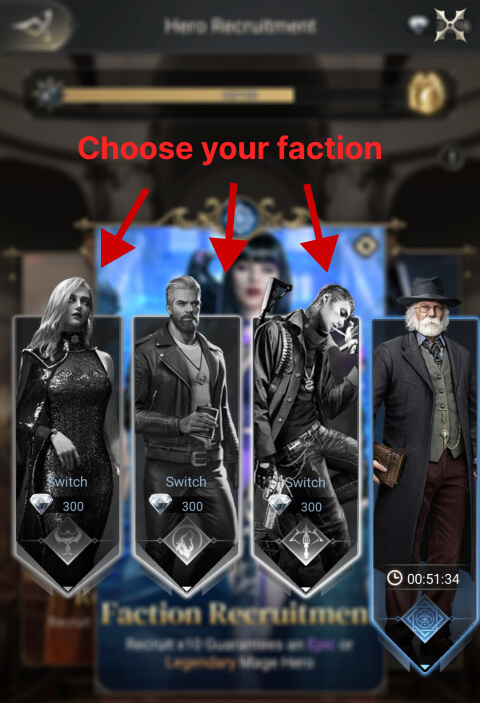
Since my chosen faction is Vampire and is better to recruit as many legendary heroes as possible for the chosen faction first, I did not notice (and frankly speaking, I did not know how this feature worked either) that the current faction was the Hunter one.
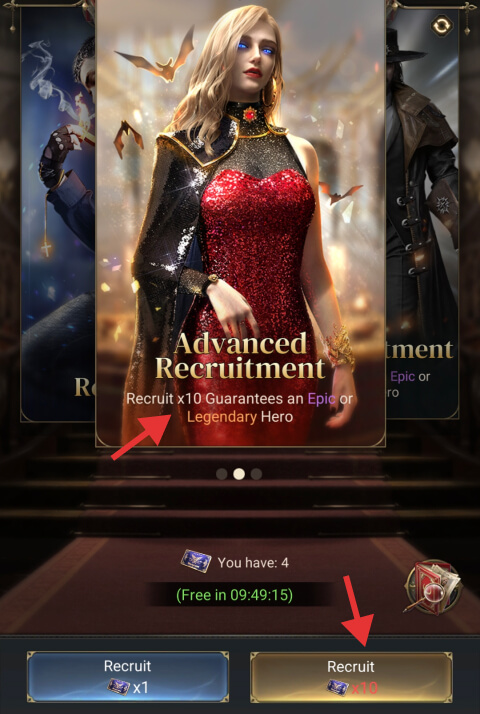
The Faction Recruitment Cards work exactly like the Advanced Recruitment Cards, the difference being that with the advanced ones you have a chance of recruiting heroes from all factions, while the Faction Recruitment Cards only offer you heroes from a specific faction.
Before using your Faction Recruitment Cards, make sure that your chosen Faction is the one that is active (they change regularly). If it is not, hit the refresh little icon on the top-right corner (see the image above), pick your faction, and pay the 300 diamonds because it’s worth it.
4. Expand your town’s territory
The more you expand your town’ area’s territory, the more useful buildings and content you can discover and unlock. For that, you first need to clear as many ruins as possible, repair buildings, rescue survivors, eliminate all the enemy camps and upgrade your town’s wall. By clearing the ruins, you will also be rewarded with Crystals and resources. All you have to do is press and hold the ruins for 1 sec and hit the shovel icon that pop-up soon after that.
5. Keep an eye on Prosperity
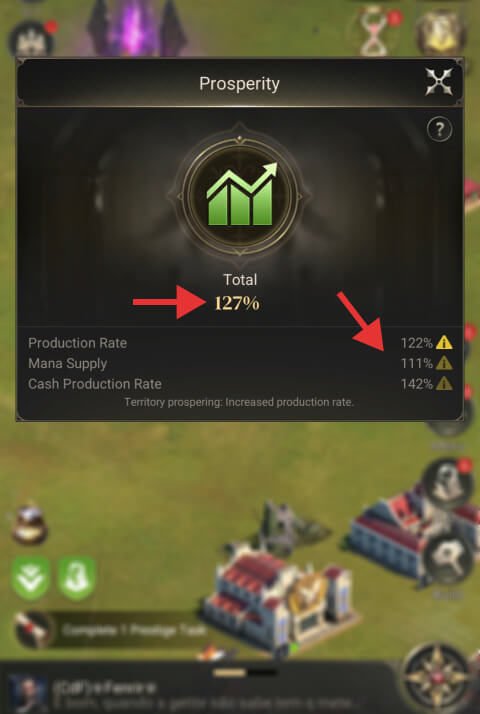
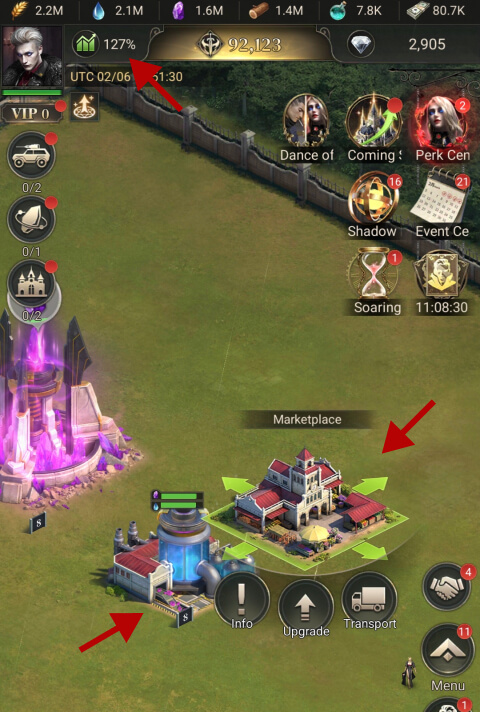
The Prosperity chart informs you how well your town and its territory are doing in terms of economic performance. The buildings in your territory require resources, Cash, and Mana to be built, and the more you increase their level, the more resources they will consume. If the overall resource production is lower than what your buildings consume, the Prosperity rate will drop below 80% and the resource production rate will decrease as well. This will slow down your game progress because you won’t have enough resources to upgrade your buildings.
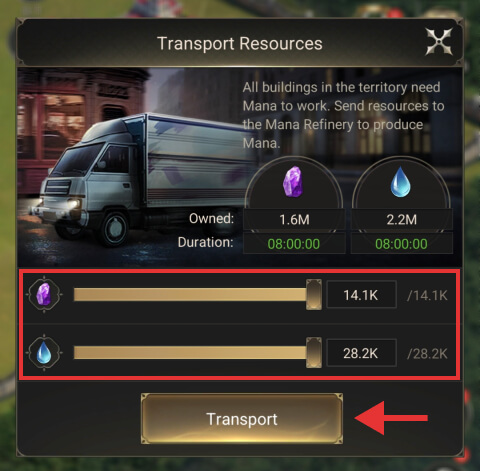
To avoid this, you should constantly upgrade the Mana Refinery and the Marketplace until they match the current level of your Town Center. In addition to this, you should also transport resources to these two buildings and make sure they never run out of them. Mana Refinery requires Crystals and Water to produce Mana, while the Marketplace requires Food and Wood to produce Cash.
6. Create a strong team of heroes
There are 4 hero rarities in Nations of Darkness: Rare, Exceptional, Epic, and Legendary. Each hero has unique abilities and stats that when combined create powerful teams. The Legendary heroes are the most powerful in the game as they have the best stats and skills. To help you out, we created this Nations of Darkness hero tier list, which ranks the best heroes from each faction and rarity.
The heroes can be improved by increasing their levels and upgrading their skills and tiers (star rating). Once you reach Town Center level 17, you will also be able to equip your heroes with items that further improve their stats and abilities.

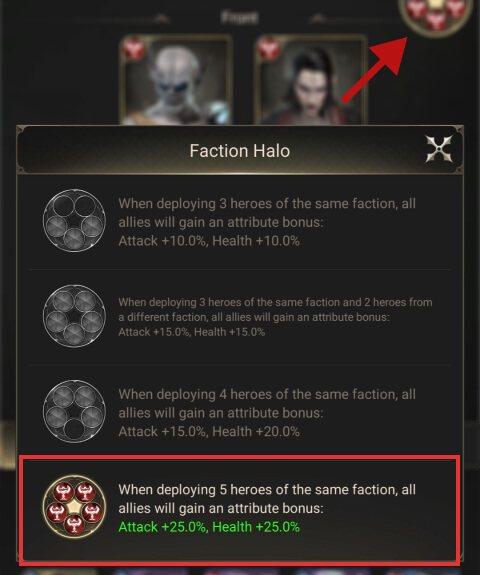
To create the best possible team of heroes for Explore scenarios, and Abyssal Fortress Explore stages, you should have a team with as many Legendary heroes as possible, and all from the same faction. The reason for this is that each additional set of two heroes will get powerful bonuses that can increase their Attack and Health by up to +25% for a full team of 5 heroes of the same faction.
7. Use your Queue Speedups wisely
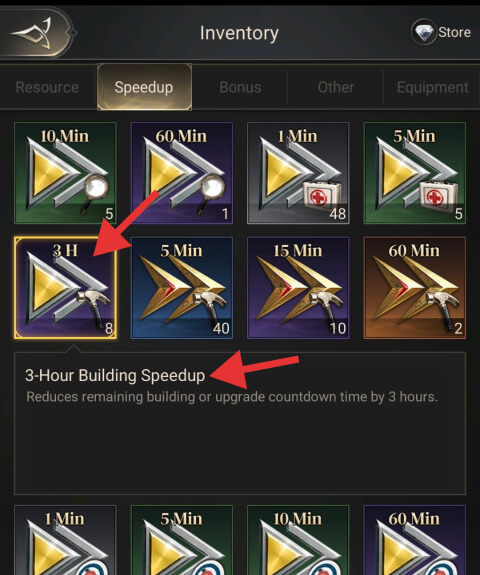
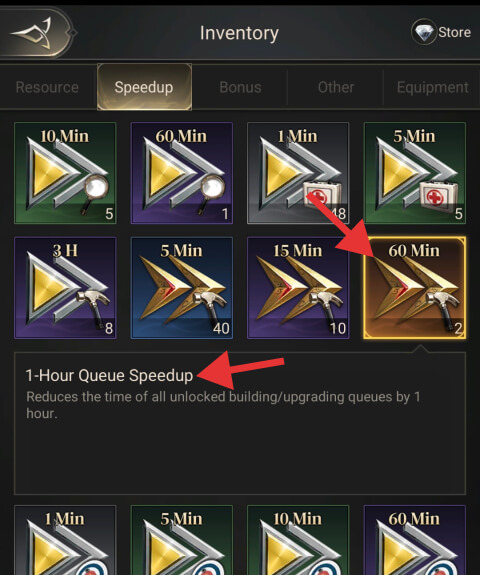
As you probably already noticed, in Nations of Darkness there are speed-ups for specific uses such as training troops, researching techs, or building/upgrading buildings. But you might as well receive Queue Speedups, which can also be used for building/upgrading buildings but they work differently.
And this is a bit confusing because both, the Building Speedups and Queue Speedups, have the same hammer icon displayed on the bottom-right corner, and I was so frustrated when I could not find them in the list to speed up my Town Center upgrade process.
Therefore, they cannot be used like any other speedup, meaning clicking the building and then using the Speedup, or the Quick Speedup buttons while the building is upgrading. They cannot be used by tapping them in the bag either. Instead, the Queue Speedups can be used and should be used only while having all the building queues active.
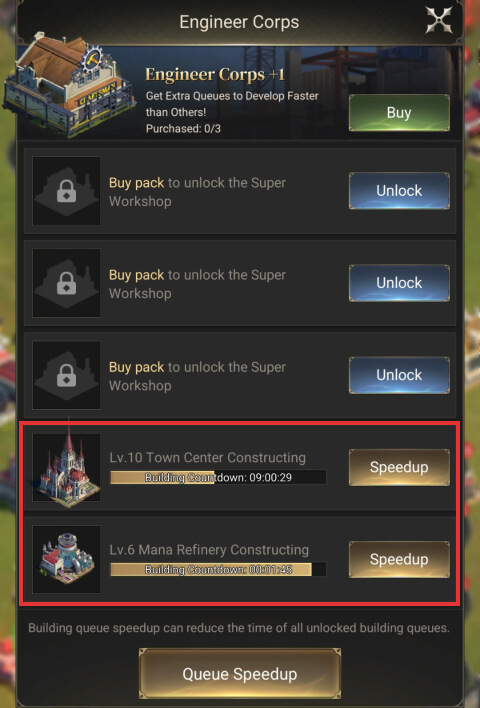
For example, let’s say you have a 1-Hour Queue Speedup, and only the Town Center is upgrading, but you still have one more slot to build/upgrade another building. You should first start the second upgrade (or more if you have more than 2 queue slots), and only then you should use the Queue Speedup. This is because that 1-Hour duration will be applied to all the queue slots, so all will be reduced by 1 hour.
The quickest way to use your Queue Speedup items is by tapping the Engineer Corps icon (the small, circled castle icon on the left side of your screen). Next, press the Queue Speedup button at the bottom, and use any of your available items.
8. Check the Recommended Power
To avoid being defeated and slaughtering your troops, you should check the Recommended Power before attacking Bat Elder Camps. This info is displayed above the “attack”Attack” button and more info after pressing it, above the “March” button. Once the text is green, or your power is higher than the recommended one, you can launch your attack.
To increase your power, you can rescue or train more troops, upgrade your existing heroes, and recruit new ones with better rarity, as well as unlock more hero slots by upgrading your Town Center.
9. Log in consecutively for 7 days
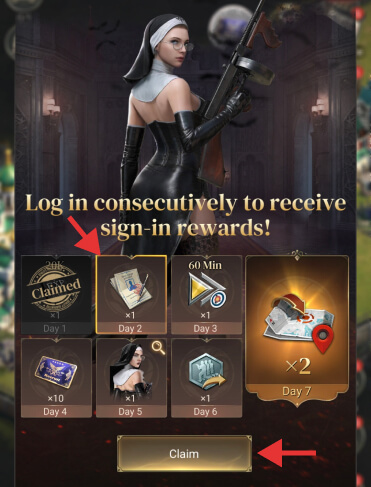
Logging in consecutively for 7 days lets you build a strong start to your gameplay as it can give you a variety of rewards each day. On the first day, you will be able to get a 20,000 Hero XP item that you can use to increase the level of any of your best heroes. On the second day, you’ll get a Rename Card that you can use to change your nickname.
On the third day, you will receive a 1-Hour Training Speedup, and 10 Advanced Recruitment Cards on the fourth day, that you can use to recruit heroes. On the fifth day, you’ll get Phoebe, an Epic Hunter faction’s hero, one March Recall item on the sixth day, and 2 Advanced Teleports on the seventh consecutive day.
10. Use your Free Daily Recruitment Cards
Each day you have 3 free Standard Recruitment Cards that can be used to recruit Exceptional and Rare heroes, and 1 free Advanced Recruitment Card that can be used for recruiting Exceptional, Epic, and Legendary heroes. The cooldown between the 3 free Standard Recruitment Cards is 10 minutes. To use these cards, tap the Hero Tavern building and hit the Recruit button.
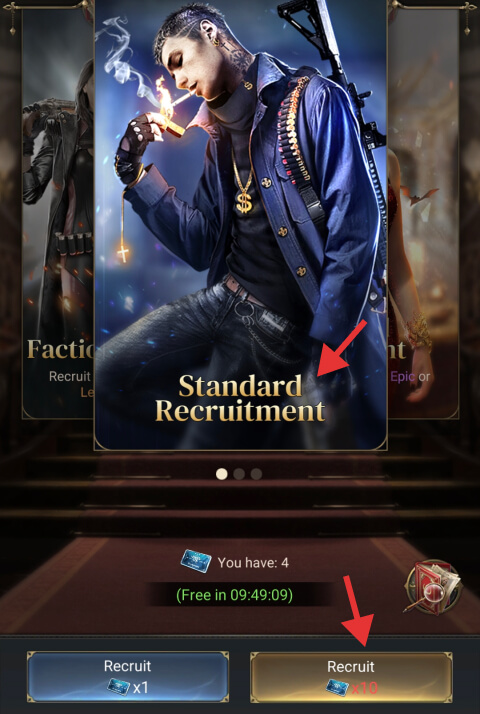
Next, you’ll see a page with a slider that contains these recruitment cards. Swipe with your finger in any direction and use the cards you have for each. The free recruitment cards do not stack from one day to the next, that’s why is important to use them as soon as they become available, daily.
In addition to the free recruitment cards, you can also use the ones you already accumulated. To increase the chances of recruiting heroes, you should always use these cards in packs of 10. This will also guarantee at least one hero drop, whether is Exceptional and Rare for the Standard Recruitment Cards or an Epic or Legendary hero for the Advanced Recruitment Cards.
11. Claim your online rewards
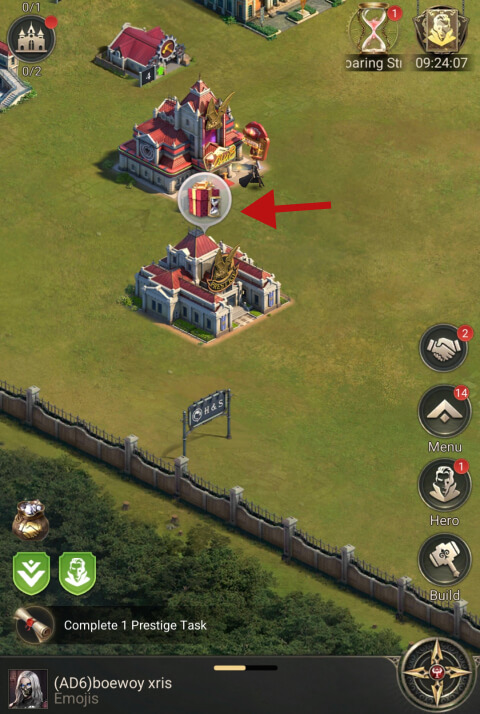
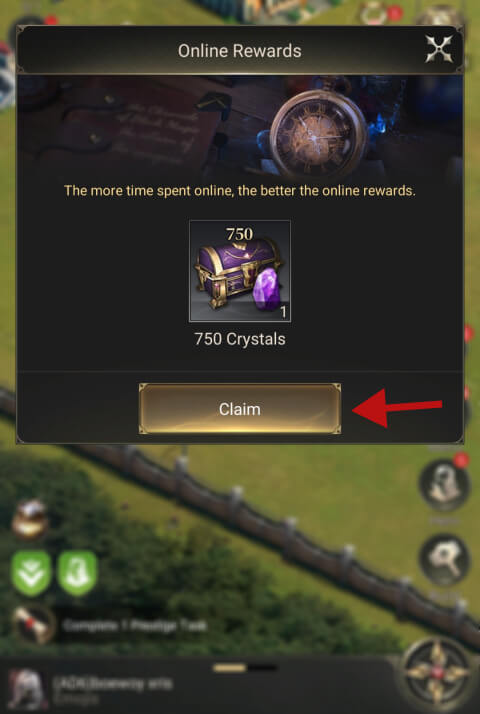
The Online Reward can be a great way for beginners to accumulate more resources in Nations of Darkness. The online rewards appear every 5-10 minutes over the Hall of Prestige building and can be claimed for free. The rewards can include, resources, speedups, Crystals, Cloudy or Pure Stones of Origin, and other essential items. The more time you spend online in this game, the better these rewards will be.
12. Link your account to Google or Facebook
To ensure that your progress is saved and that you can access it from any device, it’s important to link your game account with Google or Facebook. This can be done in-game by going to Settings, tapping the Account icon, and then selecting either Google or Facebook (we recommend Google). Doing so will also allow you to switch between different characters.
13. Create additional Characters
Whether you want a fresh start, or maybe want to try out any of the other 3 factions, creating a new character is the way to go. You can have up to 2 characters on the same server but you can create more on other servers if you prefer. Having a second character is also a great idea for farming – you can create an Alt character to farm resources, while your main character focuses on leveling up.
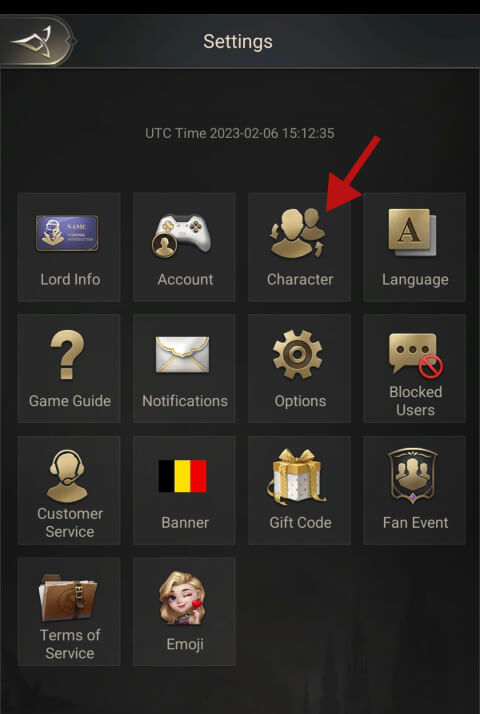
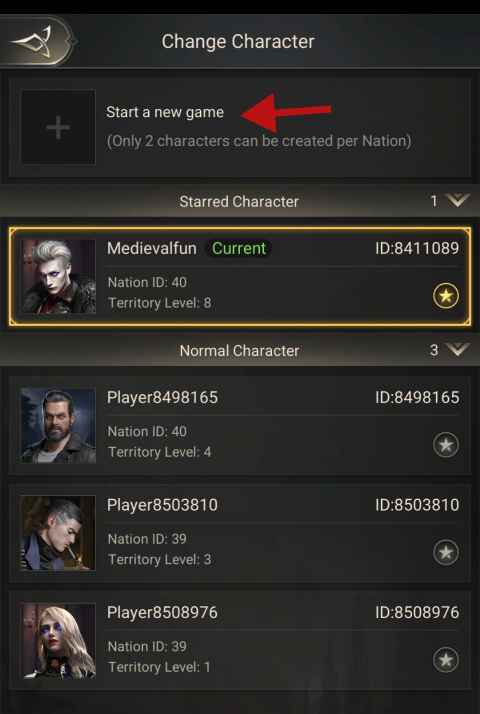
You can create a new character by visiting the Settings page (tap your avatar and click Settings on the bottom-right corner), and selecting the “Character” option. Next, tap “Start a new game” and select a server. The servers where you already have a character created, will be marked with a user icon, while those on which you already have two characters will display the message “Character limit reached”.
14. Collect your VIP daily free rewards
The VIP feature can be a great way to increase your town’s productivity and collect great rewards for free. Each day you have a gift chest that gives you various items such as hero fragments, VIP points, Hero EXP, resource items, and more. These rewards become increasingly valuable as you level up your VIP level, which can be increased up to level 15.
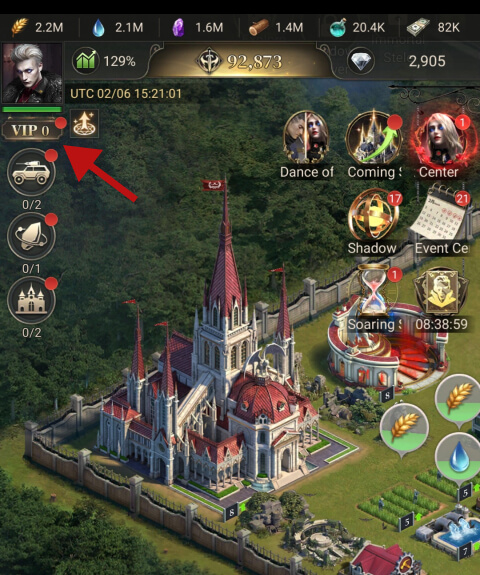
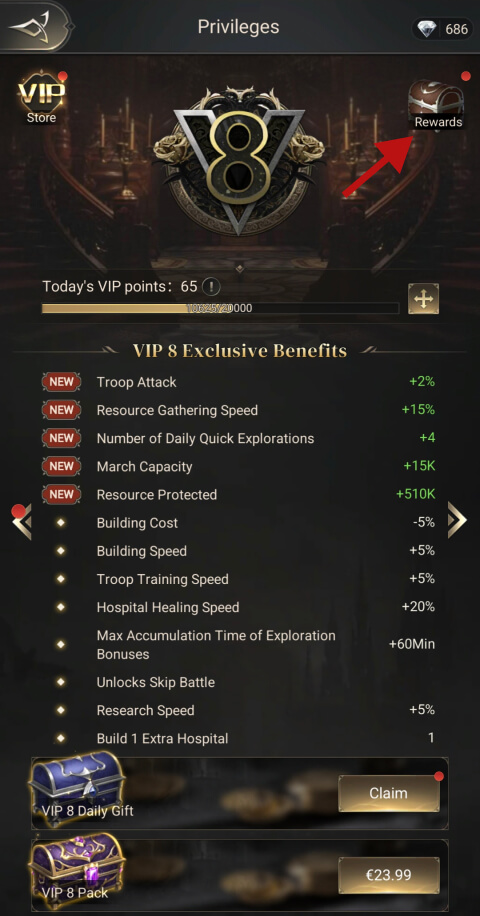
The VIP gift chest is located on the bottom left corner of the VIP page, while on the top-right corner, you have another free daily chest that includes only VIP points. The more consecutive days you log in, the more points this chest will include. These points can then be used to upgrade your VIP level.
To collect your rewards, access the VIP page by tapping the VIP label located below your avatar. Next, simply tap the “Claim” button and the chest located at the top, and collect their rewards. Don’t forget to check in every day for more rewards!
15. Hunt Snalygasters as soon as they appear
The Snalygasters are the invading giant bat creatures that appear regularly in your town area. You can hunt them by simply tapping them. Once you do that, your guards will hunt them down and you will be rewarded with resources and Cloudy Stone of Origin and Pure Stone of Origin.
These two types of magic crystals can be used to increase XP for the Guardian Statue, a magnificent building that can be used to research and upgrade a series of powers that will highly increase your town’s resource productivity.


