Lonely Survivor is a super-fun and engaging roguelike mobile game where you can challenge yourself with endless waves of enemies and upgrade your skills. Is quite similar to Survivor.io, with plenty of great content to keep you busy. While the controls are pretty easy, the strategic choices you make in the game can have a huge impact on your victory.
With dozens of levels and stages to break through, you might need a good strategy to defeat all the minions and bosses. To help you out, we’ve gathered some essential tips and tricks that will help you win more quests.
Gather the crystals like a pro
To advance in the game, you will be required to defeat all the stage bosses, up to the last one which is the most difficult. But jumping from one level to another is not enough. You need to farm as many crystals and XP as possible.
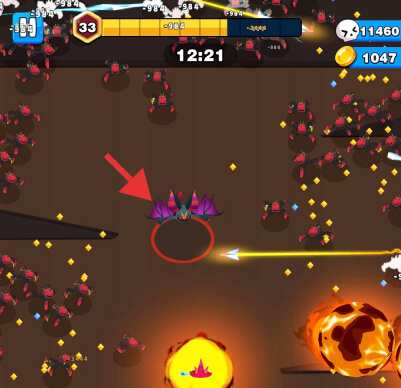
As you see in the above video, the most efficient way we found to collect the crystals is to place your hero near a magnet item and defeat as many enemies as possible.
Once you are happy with the number of crystals accumulated around you, or if you see a minion or a boss approaching, you can run toward the magnet and it will automatically collect all the scattered crystals. As you’ll see we jumped from XP level 36 to 42 immediately using this method.
But you should keep in mind that this method works only if you have chosen powerful skills (more on this, below).
Get your daily free stuff
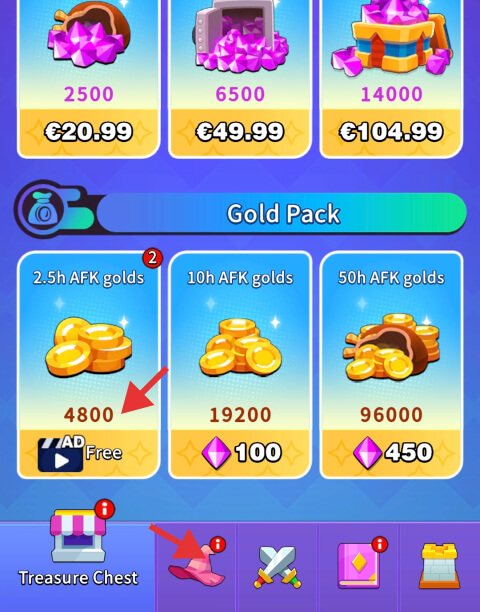
Lonely Survivor has plenty of free stuff for you to collect as you progress and unlock new features. As a beginner in this game, the first ones you should collect are included in the “Treasure Chest” tab, the place where you can obtain new equipment.
Although this page includes a lot of premium offers, you also have a few good options as well. You can collect these freebies by watching some short video ads.
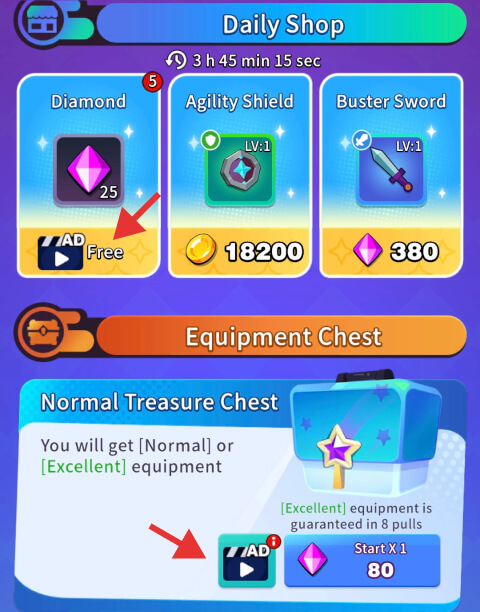
You can open one free Normal Treasure Chest once every 20 hours, which might include a Normal or Excellent equipment item. You can also open a free Epic Treasure Chest, once every 48 hours. This chest might include Excellent, Rare, Epic, or SSR-quality equipment.
You can also get free Gold and Diamonds a few times every day. The Diamonds section, displayed at the top of this page, offers you 25 Diamonds each time and can be collected up to 5 times a day.
The Gold section, visible at the bottom of the Treasure Chest page, offers you 4800 Gold for every video ad you watch and can be collected twice a day.
Customize your profile
Lonely Survivor offers you the possibility to change your player name as well as the avatar and add avatar frames. While, unfortunately, the game does not feature any PvP option so you can show off your avatar collection on a leaderboard or something, customizing your profile still adds a personal touch to the game.
It can be fun as well, especially if you manage to unlock new avatars and share some screenshots with your friends on your favorite social media.

The first rename is free, while any additional change costs 200 Diamonds. As for the avatar, currently are 14 avatars in total, but you will have to unlock a new hero (more on this below) for every new avatar listed in the gallery. So it will take you some time, but it’s an extra fun, challenging task.
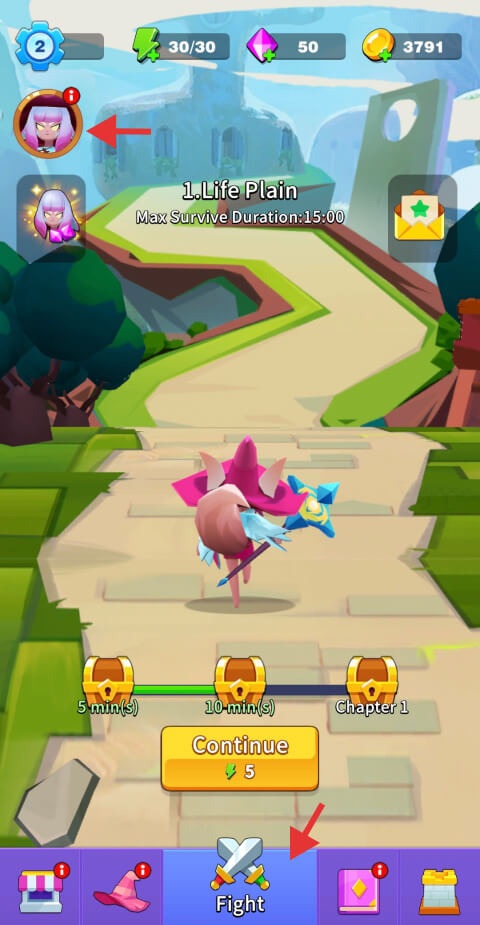
To change your player name or avatar, tap the “Fight” tab at the bottom, and hit your circled, default avatar in the top-left corner. Next, tap the little pen icon to change your name, or select a new unlocked avatar.
Keep moving to succeed
Although the magnet method we showed you above can be a good way to farm crystals, those magnets don’t drop so often. Not only that but in the first half of each level, it is recommended to keep moving so you avoid tough enemies and farm crystals and skills as much as possible.
Once you have reached a certain level and upgraded your skills, you can then go back to the magnet method to collect more crystals.
Stay away from these minions
Every stage is full of dangerous minions from which you should stay away. In some cases, they might be a bit difficult to observe, especially if they come with large hordes of enemies.
Whether is a giant bat, a huge minotaur, or any other large-sized creature, make sure you avoid and attack them from distance, as they will drastically reduce your HP.
Pick the right skills
Your hero’s chosen skills have a major impact on how you play the game, and whether you will be able to defeat the toughest bosses or not. As you’ve noticed, in each level of the Campaign or event, you have the opportunity to increase your XP level, which will determine how many times you can receive new skills and better rewards at the end.
The more XP you manage to farm, the better. And for that, you’ll need to defeat as many enemies as possible and collect the crystals dropped from them.
To ensure you have the best results, make sure to choose the most powerful skills each time you have the opportunity. The first thing you should look for when picking a skill is color.
They start from turquoise (the less effective skills), blue, and purple, which are the most powerful skills in the early game, but their drop rate is very low.
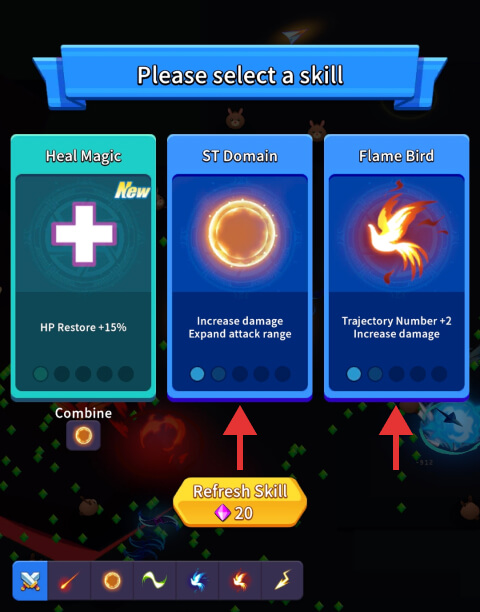
But that’s not all. Among the blue-colored skills, there are a few that are much more powerful than the other ones, such as:
- ST Domain – This is by far the best blue skill in Lonely Survivor because it will activate a fire circle around you and defeat all the enemies that touch it. The more you upgrade this skill, the wider and more powerful the circle becomes.
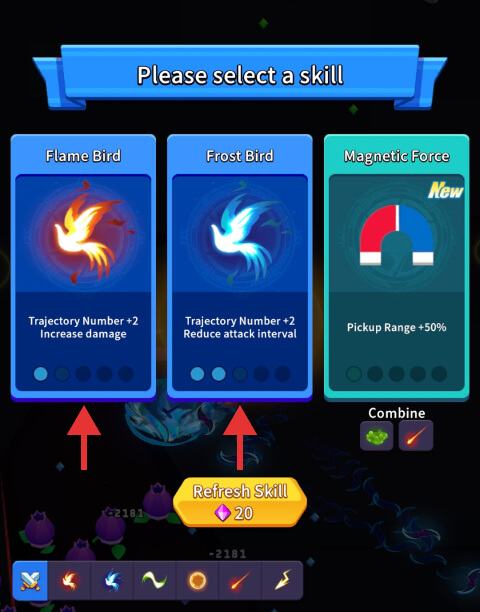
- Flame Bird – This bird will throw flames continuously and defeat all the enemies within its range.
- Frost Bird – Similar to Flame Bird, but instead of fire it will throw ice and defeat all the enemies near you.
- Fireball – This will upgrade your default hero’s attack.
- Boomerang – as the name implies, it will throw boomerangs that will defeat multiple enemies at once.
- Whistling Arrow – an arrow that bounces continuously and crushes all the enemies in its way.
Unlock and challenge the Magic Tower
The Magic Tower, visible in the bottom-right corner, becomes available when you reach player level 10, the number displayed in the top left corner on the blue cogwheel icon.
Once unlocked, it will offer you one random buff and one random debuff, which can be a good thing and a bad thing at the same time, depending on what you get. These buffs and debuff effects can also be upgraded by clearing the Magic Tower’s levels.
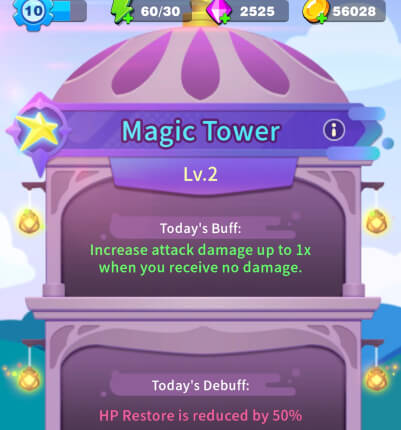
To give you an example, in our case, we’ve got a buff that increases the damage up to 1x when the hero does not receive any damage. The con, I mean the debuff, is that the HP Restore is reduced by 50%. The good news though, is that these effects change on a daily schedule, so you might get something better the next day.
Nevertheless, the Magic Tower is still worth the challenge, as it can provide you with a few extra rewards for the first clear of every stage. You can challenge the Magic Tower 3 times a day.
Sign in consecutively for 7 days
On the first day get a Normal Key, an Epic Key on the second day, 50 Diamonds on the third day, 20 Random Scrolls on the fourth day, and 50,000 Gold on the fifth day.
On the sixth day, you get 1 Strength Crystal, that you can use for upgrading your talents. Finally, on the seventh day, you get a Wish Key, that you can use it for Wich Chest draw.
While on the same pop-up window, you will notice two tabs at the bottom, Quests, and Pack. The quests tab includes a series of mini-quests that will reward you with 20 Diamonds each time you complete one, plus 10 Ent Points.
These points will be automatically added to the progress bar displayed at the bottom, which includes 7 special chests. Most of these chests will reward you with Epic Keys and Random Scrolls.
But that’s not all. The 5th chest will reward you with an Epic Guardian Armor, while the 7th chest, the last one on this chain, will include an Epic weapon, quite powerful. So make sure you log in every day and complete as many quests as possible.
Equip and upgrade the right items
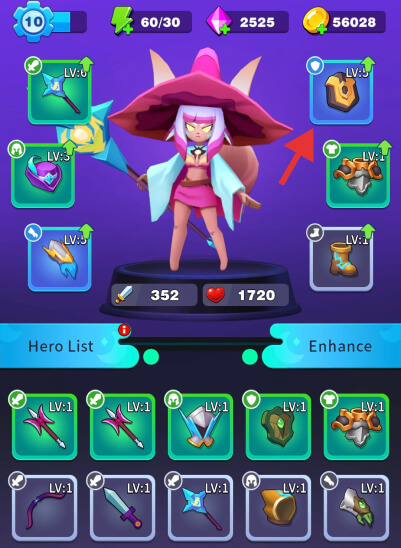
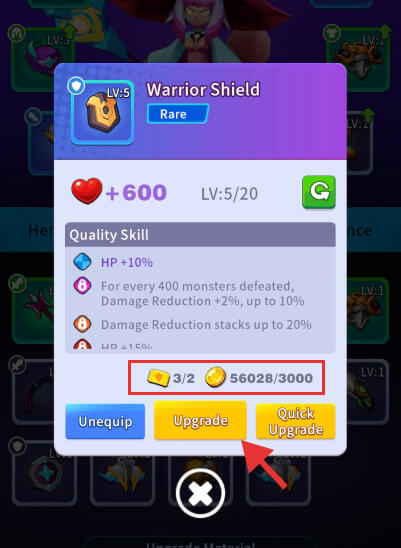
Another great way to boost your hero’s stats is to equip them with the right items. You can see what items you have collected by tapping the “Equipment” tab at the bottom of the screen. As you’ll advance in the game, you will receive various equipment items as rewards. These items have different stats depending on their rarity, such as:
- Normal – these items have a gray color and they are the least effective items you could get
- Excellent – despite their name, they are actually not that great at all. These items have a green color and are slightly better than Normal ones.
- Rare – these items are quite good, especially in the early stages, and have a light blue color
- Epic – these are almost the best items in Lonley Survivor and have a purple color.
- SSR – these are the most powerful items in Lonley Survivor and are basically an advanced version of Epic items, having a mixed theme of purple and gold colors.
Normal items can be upgraded up to level 10, Excellent items up to level 15, 20 for Rare items, and Epic and SSR items up to level 30.
Upgrading a piece of equipment requires gold and specific Scrolls for each type of slot (weapon, helmet, gauntlets, shield, etc.). Upgrade your best items as often as possible to make your hero even stronger.
Upgrade the talent tree

The talent tree will help your hero become stronger and stronger as you progress in the game. Upgrading talents require Gold, lots of it, and it can be obtained by completing levels, participating in events, or from the gold bags and barrels you might find while clearing stages.
While on the talents page, on the right side, you have a separate column that can be upgraded only with red stars and you can check how many you’ve collected at the top of this page.
So gather as much gold as you can from freebies and clearing stages and upgrade this talent tree as often as you can. This will increase your hero’s HP and attack, decrease the elite monsters’ damage, and much more, making your hero unbeatable even against the strongest enemies.
Level up or pick a better hero
Just like the hero equipment items, heroes can also be leveled up. Their levels can be increased up to 200 and require Gold and Hero XP. Likewise, the hero skills can be upgraded as well. To upgrade a hero, you must first finish Chapter 2.
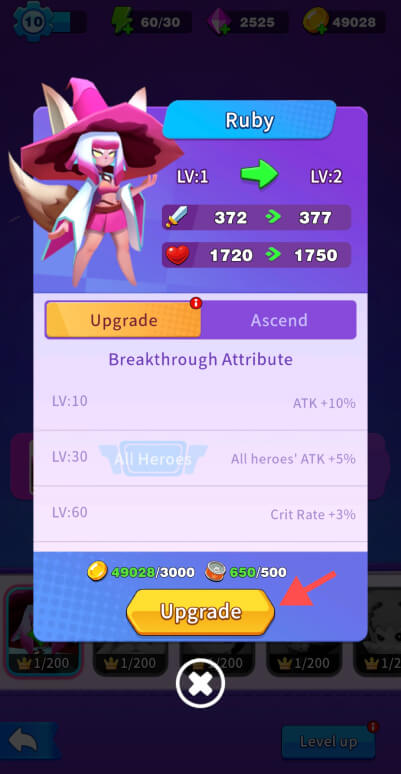

Once you do that, you will be able to level up or ascend a hero skill by visiting the Equipment page. Next, tap the “Hero List” blue button. On this page, you will be able to upgrade your hero or choose another one.
There are 8 heroes in total at the moment, each having unique powers and stats. The one we would like to recruit is Zeus because he has a default skill similar to the ST Domain ring skill, which keeps the enemies away.
To obtain new heroes unfortunately is not an easy task because you will need 50 shards of the same hero to be able to summon him, and their drop rate is extremely low.
Merge your equipment

If you have at least 2 duplicates of the same piece of equipment you can merge them into one item with a better rarity. For example, 3 Normal items combined will result in one Excellent item. To do this, visit the “Equipment” page and click “Enhance”.
Next, select the item you want to merge, or simply click the “Quick Merge” button and it will automatically pick and combine the duplicated items for you. This is a great way to increase your hero’s power.
Bind your game account
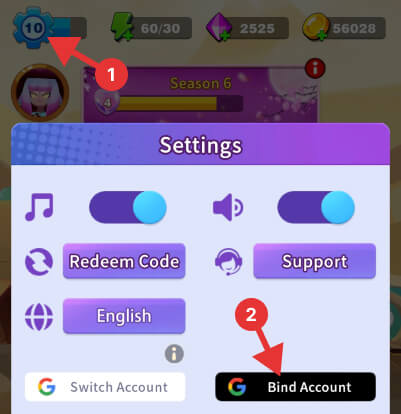
If you plan on playing Lonely Survivor for a long time, you should definitely bind your game account. This will allow you to restore your progress if something bad happens, or play the game on multiple devices while having your progress automatically synced between them.
To bind your account, open the Settings page (the gear icon in the top left corner) and tap “Bind Account”, and follow the steps to link your game account to Google.


