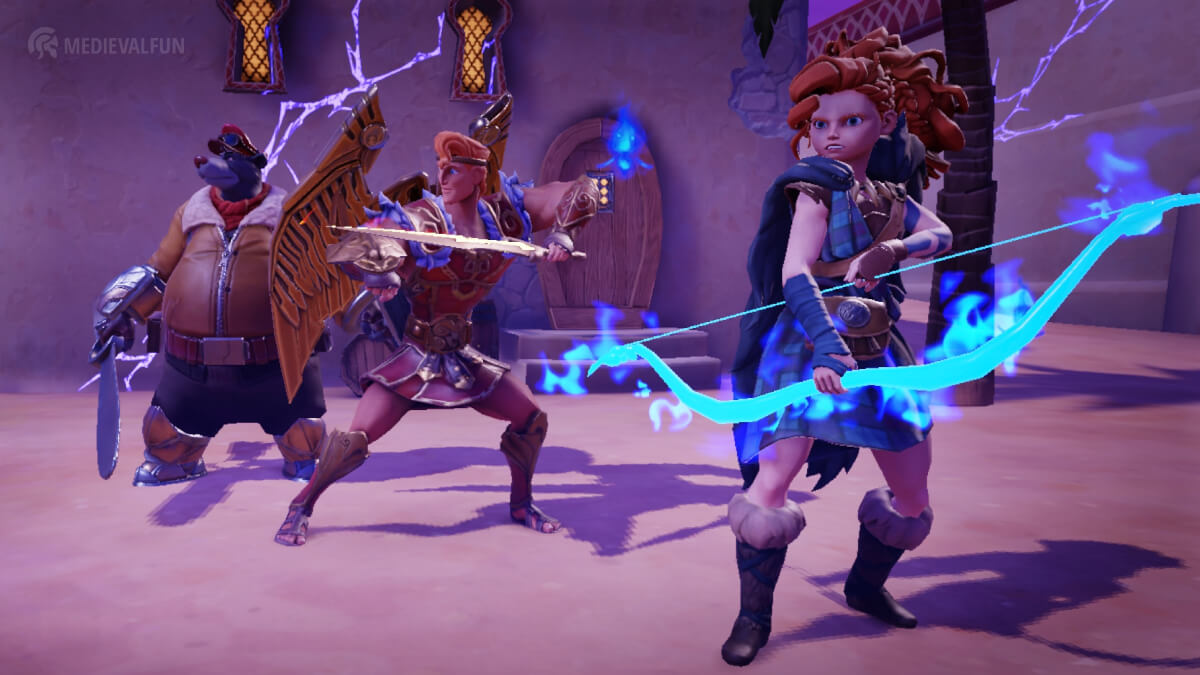
Disney Mirrorverse has plenty of action and adventure with a great selection of characters and activities. This visually pleasing action RPG mobile game offers plenty of solo and multiplayer battles that will keep you entertained for hours. Since its launch a lot of new content has been added to the game, making this game still as exciting as ever. Before you jump in and start playing, here are some tips and tricks for Disney Mirrorverse to help you have a great start.
1. Understanding the vast collection of items
The first thing you should do as a Disney Mirrorverse beginner is to understand the variety of items available in the game. There are two main in-game currencies: Gold, and Orbs. Gold is the most common currency, while Orbs are more valuable. Both are displayed at the top of the screen, as well as the energy points.
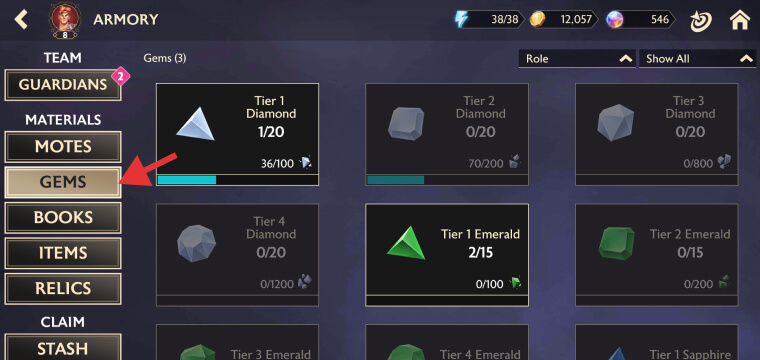
Gold can be used for ranking and leveling up your Guardians and their Talents, while Orbs can be used for buying Crystals and other essential items from the Bazaar Store. But many more items in the game can help you progress quickly, such as:
- Crystals and Shards – Both can be used to recruit Guardians, the difference being that Shards need to be collected in larger amounts (in general 2000) before being able to recruit one Guardian, while Crystals can be used to recruit Guardians directly.
- Stardusts – magical items that you can trade for Guardians of your choice in the Stardust Store
- Gems – such as Diamonds, Emeralds, and Sapphires, can be used to rank up Guardians
- Stitched Hearts – Can be obtained from events and you can trade them for valuable items at the Soul Seamstress Store
- Motes – can be used to level up Guardians
- Books – you can use them to level up your Guardians’ talents
- Relics – powerful items that you can equip your Guardians with
- Ore – special items that can be used for upgrading the Relics
To check the inventory of your collected items, tap the Guardians icon at the bottom of the screen. This will take you to the Armory page where you can see the list of your recruited Guardians. Next, tap any of the following tabs: Motes, Gems, Books, Items, and Relics.
2. Choose Hercule as your starter Guardian

In the first chapter, you will be offered the choice of three melee Guardians: Hercules, Rapunzel, and Mulan. The best choice for you would be Hercules because he has the highest attack, defense, and health balance among all other melee guardians.
On top of that, his first talent, as well as his Core and Special ability, all provide him with buffs that increase his attack power as well, which makes Hercules the most powerful melee Guardian in Disney Mirrorverse.
Mulan might seem a good choice for targeting multiple enemies at once but given the fact that you always need to move to avoid being hit by high-damage enemy attacks, Mulan’s wide area attack will be more of a disadvantage. Plus, her special ability’s damage is way lower compared to Hercules’.
Rapunzel is another good option with her self-healing abilities, but her damage output is lower than Hercules’. Therefore, it’s best to start the game with Hercules so you can get a headstart in terms of damage output.
3. Master the combat controls
If you want to be successful in Disney Mirrorverse, you need to master the combat controls. The game has an intuitive combat system that allows you to quickly evade, counterattack, and use heroes’ abilities in a single tap. There are 4 controls you need to get used to it:
- The on-screen left-sided joystick moves your character around the battlefield. Simply drag it and hold it in the direction where you want your controlled hero to move.
- The big circled action button on the right side of the screen. Tap this repetitively to perform multiple normal attacks, or hold it and release it to perform a high-damage attack.
- The smaller circled buttons, situated on the right side above the main action button. These represent the special abilities of your heroes that you can use in battle, with one button for each hero. Tap these as soon as they are fully charged, but make sure that the enemies are in the range of that skill (especially the ones of melee guardians).
- Dashing, which is swiping in the opposite direction of the incoming attacks. Whenever you see a big purple ring on the ground or 2 parallel purple lines in your hero’s direction, evade by quickly swiping in the opposite direction as you see in the above video.
4. Unlock all guardian slots
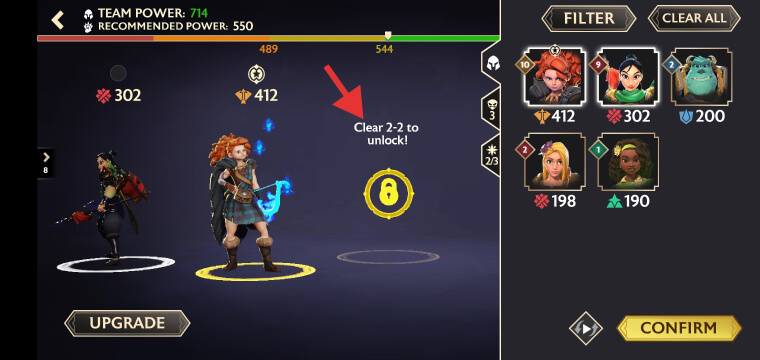
As a new player, you should try to complete as many Story stages and chapters as possible because it will unlock more gameplay modes and offer you great rewards. Another benefit of doing this is that you will be able to unlock all 3 hero slots.
You start by having only one slot, but soon after that, as you progress through the story mode stages, you will be able to unlock the second one. To unlock the third hero slot, you need to complete the second stage of the second Story Chapter. After that, you will be able to assemble a full team of 3 heroes and maximize your damage output and survivability.
5. Create the best team of Guardians
Before entering a stage, you must make sure you are well-prepared by assembling the best team of guardians in Disney Mirrorverse. You should take into consideration each character’s abilities and damage output, as well as the total power of your team. This will be displayed at the top of your screen under “Total Power”. Make sure that your team’s power is equal to or higher than the recommended power before entering the fight.
A great Guardians team should be a combination of damage-oriented guardians like Hercules or Minnie Mouse, a ranged guardian like Goofy or Judy Hopps, and a strong tank hero like Oogie Boogie or Baloo. In some cases you might also need a support/healer guardian, so you should consider leveling up at least one as well.
6. Control your favorite character
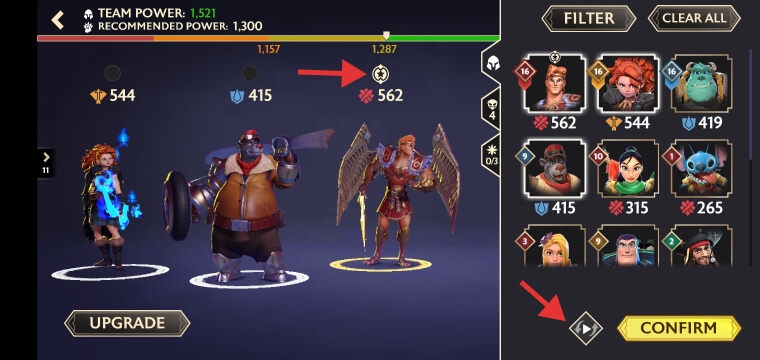
Disney Mirrorverse offers you the possibility to set your combats on full auto mode. And you can do just that, but where’s the fun in that? Another drawback of being a “guest” in your own battle is that the guardians do not perform that well in full auto mode.
To increase your chances of success, you should take control over one character and also manually use all the abilities of the other guardians in your team, as soon as they are fully charged.
To do that, you must first make sure that the auto option is not activated (the little “Play” button on the left side of the “Confirm” button, before entering the stage, should not be green). After that, tap on the hero you want to control, and you will see a little star icon above him.
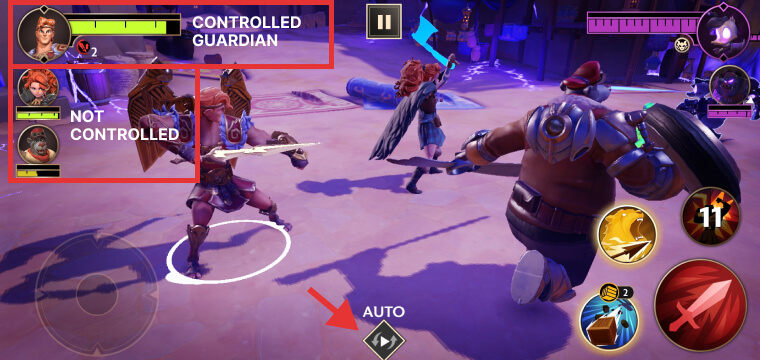
You can also turn on/off the auto mode while in the middle of a stage, by tapping on the “Play” button at the bottom of your screen. To switch the character you want to control, simply tap once on the avatar of any of your available guardian avatars on the top-left side. You can even pause the fight by pressing the “Pause” button at the top of your screen.
7. Customize your profile
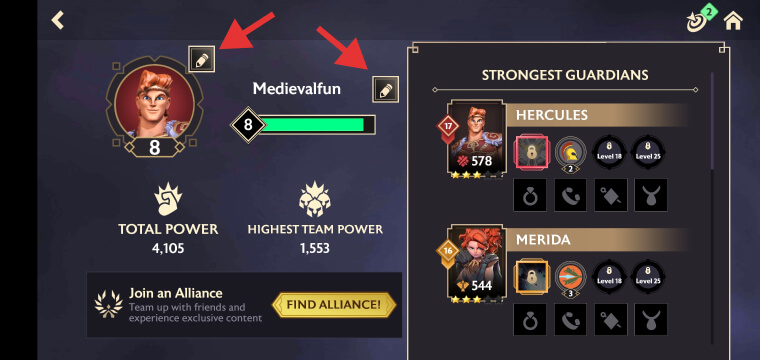
Having a unique profile will be much easier for other players to identify you, especially after joining an alliance. You can start by changing your player name, which is free for the first time. Make sure you are satisfied with it because the second time it will cost you 200 Orbs, which is quite expensive.
The avatar is completely free, but you are a bit limited in the early game in terms of avatar choices. But as you progress and recruit and complete Milestone 1 of each new hero, you will unlock their avatar and use it to customize your profile.
Both, the avatar and player name can be changed by tapping your default avatar image and pressing the little pencil icon as you see in the above image.
8. Use your energy wisely
In the early stages of the game, obviously, your main focus should be spending your energy clearing Story stages. But as you progress, you will be able to unlock more gameplay modes such as Events, Supply Runs, Royalty Tower, Dungeons, and Rift Raids.
In addition to the Story mode, Events, and Supply Runs should be your next priority as they offer one of the best rewards in the game for recruiting, upgrading, and leveling up your guardians.
The energy is displayed at the top, represented by the blue lightning icon. Once exhausted, it will be automatically refilled by 1 energy point every 3 minutes. You can as well use Minor, Major, or Superior Recharge potions that are sold in Bazaar, or Store.
9. Do your dailies
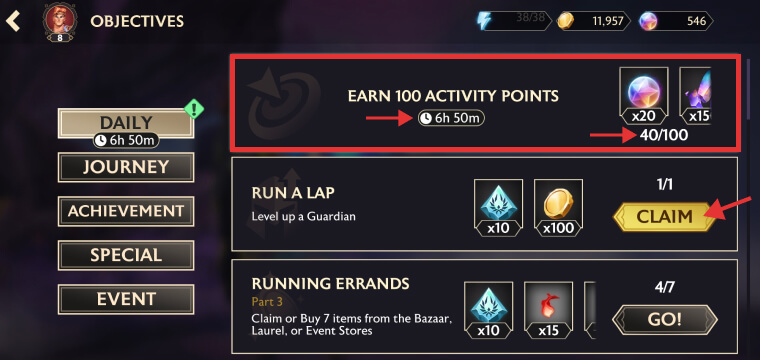
Besides completing Story stages, Daily missions should be your next priority. The “Daily” section includes a variety of missions that can be completed in order to accumulate a total of 100 activity points and get the top reward. This daily reward includes 20 Orbs, 150 Stellar Crystal Shards, and one Glowing Crystal.
The missions are quite easy to complete and can range from completing a certain number of story stages to performing certain actions with your heroes, buying items from Bazaar Store, etc. To accumulate as many activity points as possible in the shortest time, try to focus on the missions that offer the most activity points.
10. Upgrade your guardians regularly
As you progress in the game and get better rewards, it is important to upgrade your Guardians regularly. This will ensure that your team is strong enough to defeat stronger enemies and complete Missions, Dungeons, Story stages, and other content.
To increase the power of your Guardians you will need specific Motes (Melee, Ranged, Support, or Tank) to increase their levels. Increasing the rank is also a must, or else you won’t be able to pass the maximum allowed level for each rank. Guardians have also 3 abilities, which cannot be upgraded but the third one can be unlocked once you upgrade a Guardian to a 4 Stars rank.
You will also need Gems to rank them up and special Books to level up their Talents’ levels. Talents are vital for your Guardians, and each Guardian can have up to 3 active talents. The second talent slot can be unlocked after reaching level 18 with your Guardian, followed by the third talent at level 25.
11. Craft Timekeeper Crystals regularly
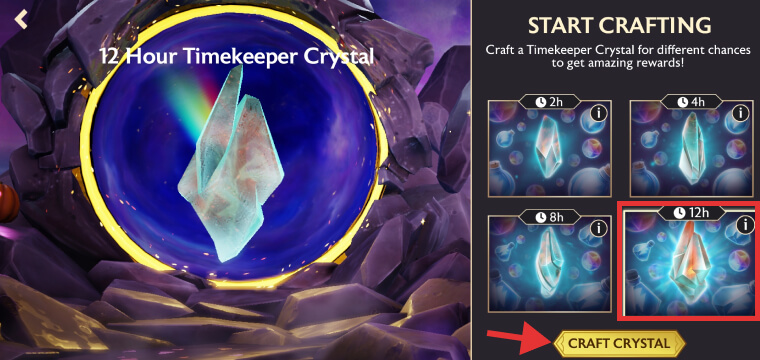
Timekeeper Crystals are a great way to get amazing rewards with minimal effort. All you need to do is to decide what type of crystal you want to craft, 2h, 4h, 8h, or 12h, and hit the “Craft Crystal” button. When the crafting time is completed, you will receive the crystal and can drag it into the timekeeper gate to claim your rewards. Each of the 4 types of Crystals offers different rewards and crafting periods such as:
- 2h Timekeeper Crystal – can be crafted every 2 hours for a high chance of getting a Minor EnergyRecharge, a good chance of Orbs, and a rare chance of a 2-Star Guardian.
- 4h Timekeeper Crystal – can be crafted every 4 hours and offers the same as the previous Crystal except that you have a rare chance of getting a 3-Star Guardian instead of 2.
- 8h Timekeeper Crystal – can be crafted every 8 hours for a high chance of getting a Major EnergyRecharge, a good chance of Orbs, and a rare chance of a 3 or 4-Star Guardian.
- 12h Timekeeper Crystal – can be crafted every 12 hours and offers the same as the previous Crystal except that with this one you have a rare chance of recruiting a 5-Star Guardian.
12. Explore Dungeons before they expire
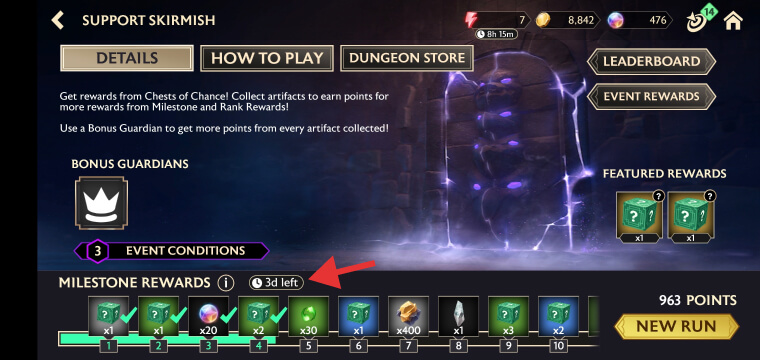
Dungeons in Disney Mirrorverse are a great opportunity for every new player in this game to get amazing rewards. For each Dungeon available, you have Milestones that consist of a certain amount of points. Each milestone you complete awards you with rewards that can range from Orbs to Motes, Shards, Ore, and other great stuff. However, each Dungeon has an expiration date (usually around 3 or 4 days), so make sure to explore them before they expire.
13. Get your free Bazaar items
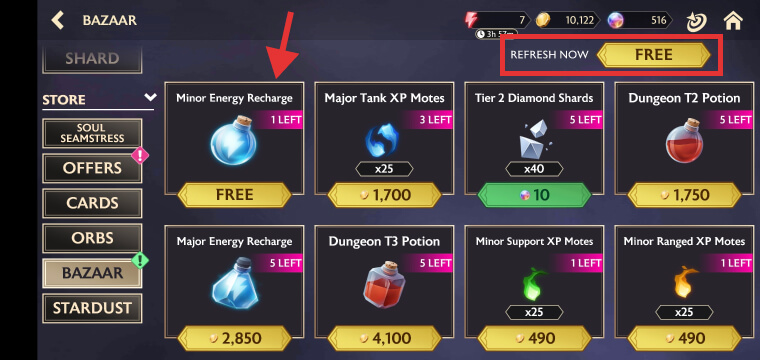
The Store in Disney Mirrorverse is divided into several different sections and Bazzar is one of them. In Bazaar you can trade Gold and Orbs for valuable items, but you can also use it to get free items. Each day you will have one free item to collect, followed by a free refresh of the entire list of items, which also includes the “freebie”. However, any additional refreshes after that will cost you Orbs, and I would not recommend it unless you desperately additional items from this store, that are not currently listed.
14. Link your account to a Kabam ID
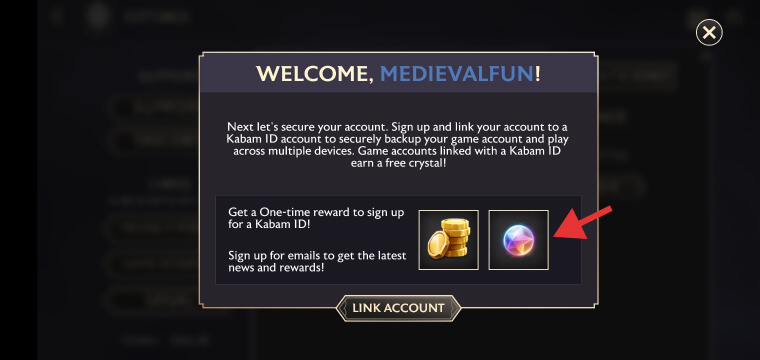
Linking your account to a Kabam ID and Google, allows you to play the game on multiple devices without having to worry about losing your progress. This is also recommended in case you have problems with your current device, as it will allow you to restore your data to the new one without worries. And the good news is that after linking your game account, you will receive a one-time reward of Orbs and Gold.
To link your game account to Google and Kabam, while on the homepage of the game, hit the 3-horizontal menu icon on the top-left corner, and press “Settings”. Next, go to “Account” and link both of them by following the instructions.
15. Remember to claim your rewards
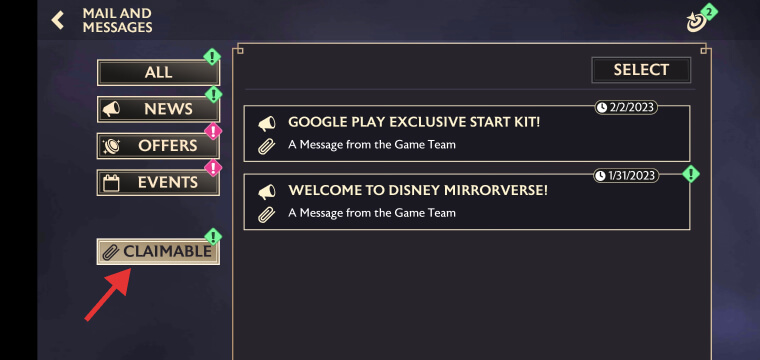
Earning rewards is fun, but remember to collect them as well. Each time you complete a mission, an achievement, or a milestone, you will see a green exclamation point on that specific area, as well as at the top of the screen on the target icon. Tap it and claim the rewards.
Additionally, you might also receive some claimable rewards in your in-game mail section, under the Claimable tab. Make sure you check this often as well, as you don’t want to miss out on any rewards.
16. Try different difficulty modes
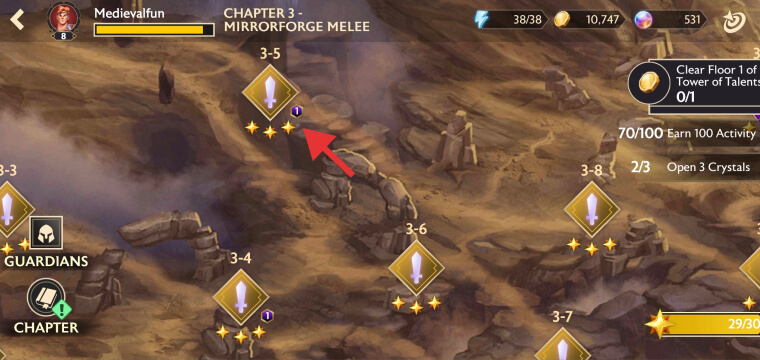
Is the normal Story mode too easy for your skills? If so, try playing Story mode on higher difficulties such as Hard, or Expert. This will allow you to get more rewards from each stage completed, and offer you an extra challenge. However, these higher difficulties require a well-balanced team, so make sure to upgrade and level up your Guardians well enough before jumping into Hard or Expert mode.
To access the Hard mode, you must first complete stage 10, chapter 4 of Story mode on normal, while the Expert difficulty requires the same progress but on Hard difficulty.
